Tag Archive for: revision

This past month I hit a wall in my work-in-progress. I really struggled revising the end of a chapter and making it feel ~complete. What I wrote was fine, but it wasn’t really good, and it didn’t do the things a chapter end should do (specifically both wrap up and carry forward). And the whole frustrating experience made me think a lot about when writers should ask for help and what kind of help they should seek.

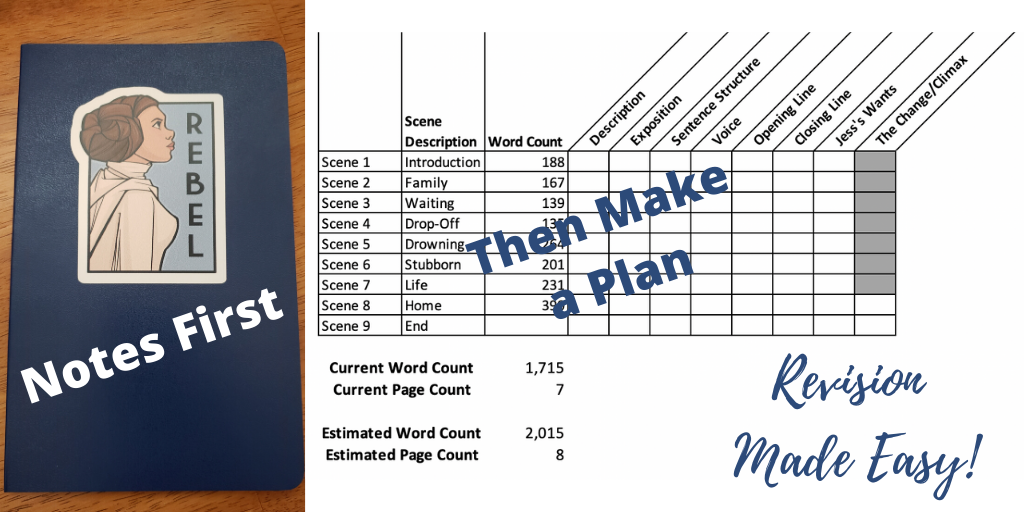
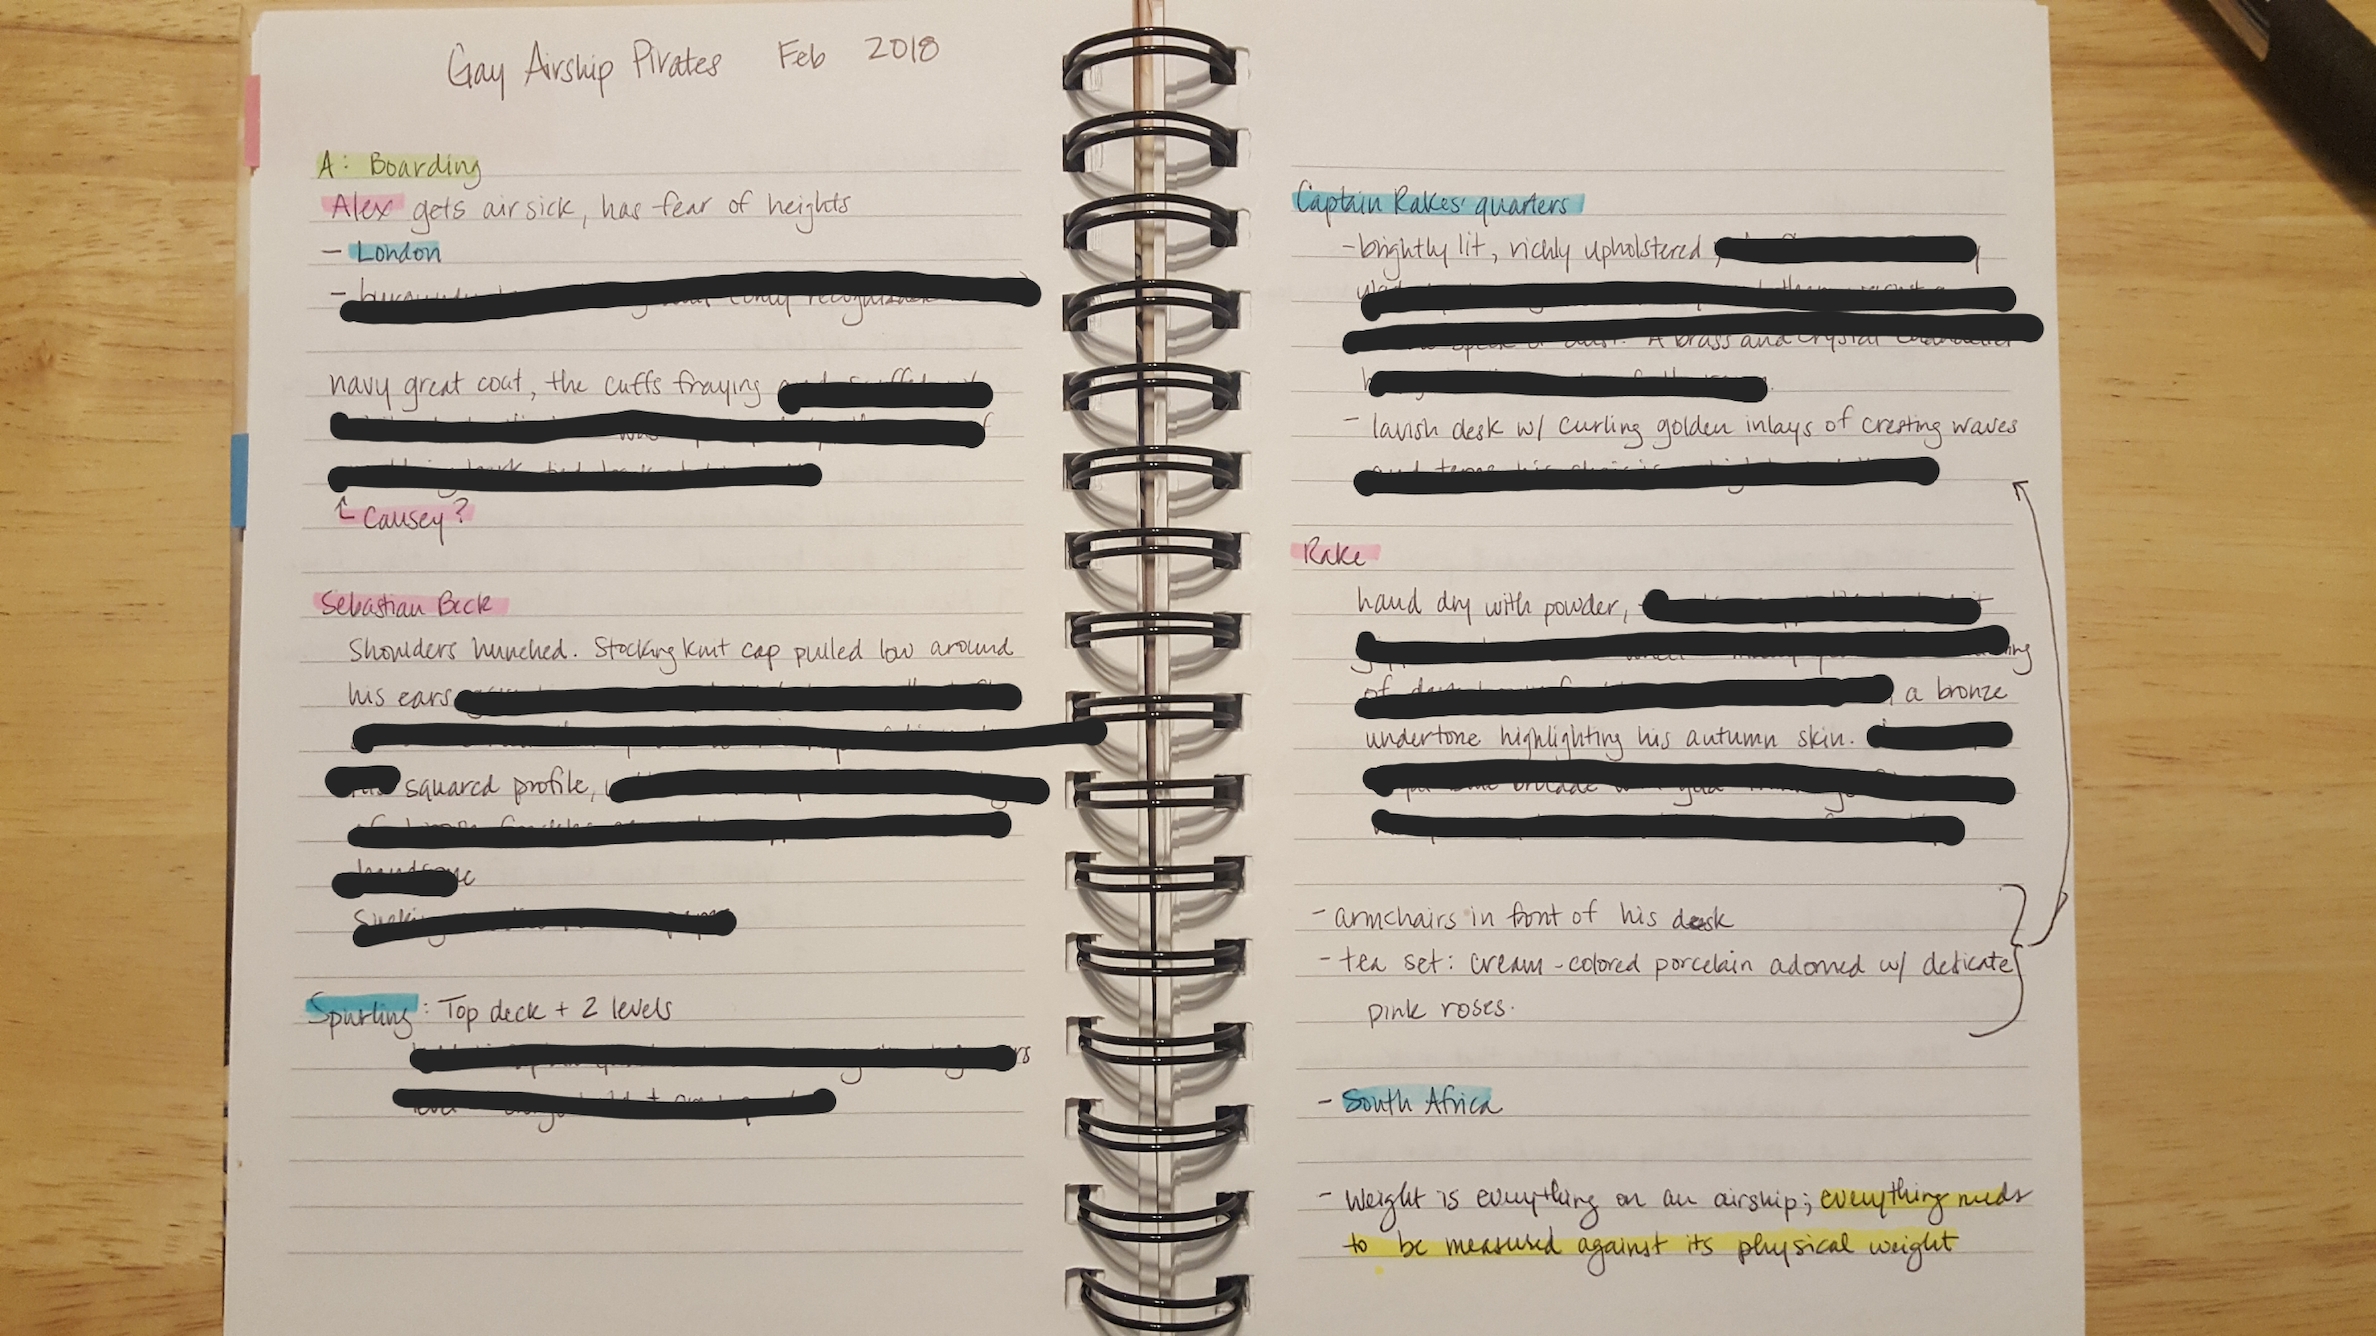
In general, my advice for writers is that they take a story as far as they can independently before asking for outside feedback and assistance. What that means will vary writer to writer and project to project. Sometimes that might be the end of a second draft, and other times the end of a fourth or fifth draft. Or sometimes it might be the end of one specific chapter that is driving you to drink and perhaps you just desperately need someone who can see the forest instead of every damn tree!

Ahem.

The kind of feedback a writer seeks depends on what they are prepared to do with the story after receiving feedback. Sometimes, like in my chapter, I need someone who can be a genius and help me pinpoint what’s wrong. That’s when I need focused feedback that will lead to a revision. Other times I really am just looking for positive reinforcement. For someone not just to tell me something doesn’t suck, but to say that it’s good (maybe even great).

The latter type of feedback is performed by Cheerleaders, and the former we’ll classify as the work of Problem-Solvers.

Cheerleaders usually come from your friends and family. They’re people who care about your emotional wellbeing more than your writing. They’re not going to lie to you, but they aren’t going to nitpick your grammar either. Cheerleaders are so important during a first draft to encourage you to keep translating your story from thoughts to prose, but they can also be important during revision while you’re crafting that first draft mess into an understandable narrative. Cheerleading support can take the form of an enthusiastic first reader or an accountability partner, or someone else who is generally excited every time you tell them you put words on the page. Cheerleaders help you finish whatever stage of the project you’re on, but they don’t help you make your writing better.

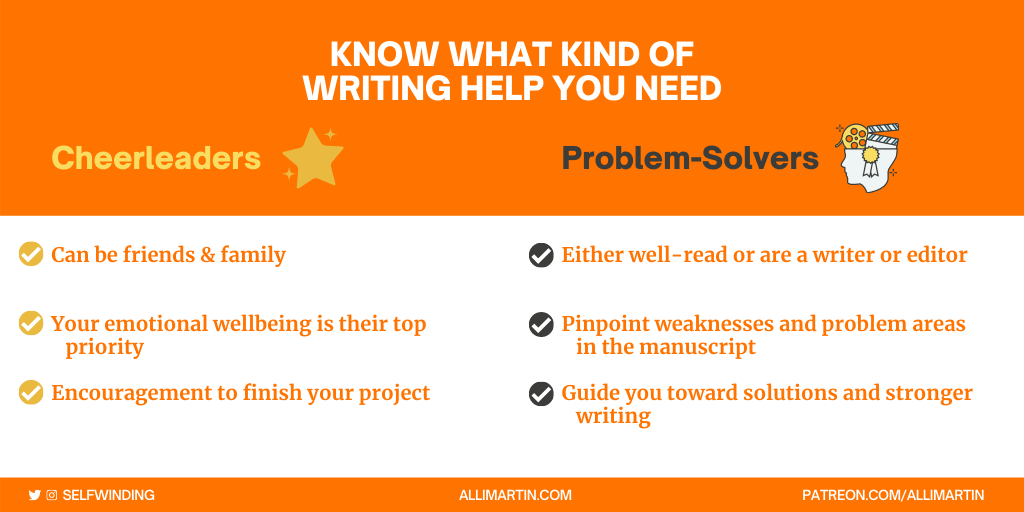
Problem-Solvers can come from your friends and family but should be familiar with your genre and are preferably either well-read or are a writer or editor. They’re going to help you pinpoint weaknesses and problem areas and, hopefully, guide you toward solutions and stronger writing. (Solution guidance is sometimes, “Have you tried X? Y? Z? AA? Etc.”) Problem-solvers are helpful when you’re stuck in a revision quagmire and can’t figure a way out (or can’t decide if the revision does the thing you need it to do). Their feedback can help you make a list of issues to address in your next revision or identify ways to polish up a nearly there piece. You can hire a problem-solver (hello), but if you’re hiring work, absolutely have a complete draft of your manuscript—you’ll get much better, more comprehensive feedback if the editor can see the whole forest.

Whether you’re looking for actionable feedback or for support, know what you need and what to ask for. I didn’t get Problem-Solver help on my end of chapter conundrum, but the Cheerleading I received encouraged me to move on and not waste time agonizing since I had another chapter to revise. The time away from the chapter allowed me to figure out what was wrong, and when I went back for a final revision—hooray! The chapter now wraps up and carries forward. So while thinking about where to get advice, never forget that the best adviser you have for your writing might be yourself.


For full access to The Write Life, sign up on Patreon for $1 or more per month. You’ll also receive a personalized thank you in a future edition of The Write Life.

This past month I hit a landmark in my daily writing goal: 1,500 days of writing! I talked about how I started writing daily when I hit 1,000 days back in 2018, so if you want the origins of this obsessive goal, check out the post, 1,000.

While I’d like for this announcement to be filled with positivity and congratulations, that’s not entirely how I feel about it because aside from writing daily, I feel like I don’t have a lot to show for all this hard work.

Since 2016 I’ve finished a novel, revised a novel (thrice), wrote half a draft of two other books, and drafted many other short stories, though I haven’t published any original fiction. In other words, my writing life has been stagnated in the measurable areas “that count.”

Writing 1,000 days provided me with consistency and confidence. It helped shake off some of the doubt I had about my ability to start and keep writing. But writing another 500 days has brought with it different concerns and questions. Most specifically, how do I turn this productivity into published works?

That’s the question I’ve been grappling with this past month. I don’t believe there’s an easy answer—and there’s certainly not one answer—but I’ve been throwing spaghetti at the wall to see what sticks, and see what sort of drips down the wall because it’s kind of sticky but not fully cooked. (If you’re getting the idea that this has been a messy process, you would be right!)

I still don’t have any answers, but I have a list of things I’ve tried:

  • I set up a new email address and emailed myself like I was a writing coach.

    Sounds goofy, but I figured it was finally time to take advantage of my abilities to analyze other people’s work and my ability to disassociate when I’m speaking to or through a character. Essentially this became a more organized way of talking to myself out loud. (And it was a little more productive, because I’d already written all the ideas in the email!)

  • I wrote a revision plan.

    This is actually an old practice, but something I haven’t done in a while, for whatever reason. I read over a short story and instead of shuffling commas and agonizing over diction, I kept notes on what needed to change and what I needed to review. I translated that into a progress chart so I could work through each item and check it off.

  • I tricked my resistance to specific tasks by making goals of other tasks.

    I admit that I didn’t do this on purpose, but it wound up working, so it’s going on the list. When I was making my Writer’s Five goals for February, there were two projects I was considering focusing on for my write and release goals. The one I picked was a short story I felt some resistance to working on, but felt pretty comfortable about where it was. I avoided working on it by instead working on the project I felt more resistance to completing because it included revising an outline and sample chapters. But, uh, I finished the outline and am into the sample chapters. While avoiding the other task. So… yay?

Do you have any “tricks” you use to get yourself to finish writing things? Mind sharing? I need some help.

Even though I’m an editor for hire, I firmly believe in self-editing. Each month I’m going to drop a tip for developing your ability to edit your own work or identify things to look for as you edit. Make sure to check out all the DIY Edit Tips to improve your self-editing.


10 Read Aloud

If you feel like grammar and syntax aren’t your strength, try reading your work out loud. Reading your work aloud is a great way to catch awkward phrases and rhythms, run-on sentences, and repeated or missing words.

Reading out loud engages a different center in your brain than when we read silently, and it’s easier to find repeated or missing words since you’ve moved from comprehension (which can rely on scanning and interpreting) to performing. The performance aspect is part of what can help you catch errors since you’re now trying to translate those written words into spoken words.

Run-on sentences can be easier to catch when spoken because you physically start running out of breath. If you find yourself taking an awkward gasp in the middle of a sentence, highlight it for further review. Sometimes it’s just a long sentence, which there’s nothing wrong with, but it could mean that you need to use the punctuation more effectively to help the reader navigate the sentence. Good punctuation helps group ideas and show how ideas are related in a sentence, thus showing a reader how to read the sentence. If you’re losing your breath on every sentence, evaluate if there are any you can shorten. A variety of sentence lengths engages the reader and makes your writing more exciting.

If you’re tripping over phrases as you read them aloud, that may be a sign that you should rework the syntax or review the diction. (Honestly, sometimes it means you wrote a tongue twister, so you don’t necessarily have to change everything that trips you up.) Some things don’t sound awkward until they’re read aloud, so taking a pass to read your manuscript—to an empty room or to a friend—can be a crucial step in cleaning it up.


Like what you read? Help me continue making this content by leaving a tip through Ko-fi.

Even though I’m an editor for hire, I firmly believe in self-editing. Each month I’m going to drop a tip for developing your ability to edit your own work or identify things to look for as you edit. Make sure to check out all the DIY Edit Tips to improve your self-editing.


09 Long Dialogue Tags

Dialogue tags, or dialogue attributions, are meant to identify the speaker for clarity but fade into the background of the narrative. That is why the simple “Joe said” is so celebrated, because it doesn’t draw attention to itself and distract from the dialogue. Even though I’m aware of this, often—especially in first drafts—I wind up with long dialogue tags in which there are multiple actions or descriptions. Having an action or description isn’t a bad thing, but coupling several with the dialogue tag can be confusing and distracting.

To simplify dialogue tags, first you have to identify what is “too long” for a dialogue tag.

  • Winded One way I identify long tags is by reading the dialogue and dialogue tag aloud. If I get winded reading the sentence, or if I have to pause and reframe my tone (because I was expecting the sentence to end earlier), the tag is probably too long.
  • And And And Another method is to look at the construction of the dialogue attribution. Most attributions are in a similar format—”character said, [continued sentence].” If the continued sentence has an “and” in it, or if it is longer than the dialogue that precedes it, it is likely too long.
  • Run On If the topic changes—for example, the dialogue is attributed to Elsie and then the continued sentence starts talking about Mike, or about something that is happening elsewhere—it is probably a run-on sentence. Remember, the dialogue attribution is still a sentence—it’s actually part of the sentence of the dialogue—and it needs to follow the basic rules of sentence construction.

Editing long dialogue tags is often as simple as inserting a period after the attribution and starting a new sentence. Sometimes the information in the sentence needs to be evaluated because it is extraneous or irrelevant (ah, the enthusiasm of the first draft). In any case, careful review of dialogue tags and keeping dialogue attribution brief can help keep the focus on the dialogue and let the attribution fade into the background where it belongs.


Like what you read? Help me continue making this content by leaving a tip through Ko-fi.

Even though I’m an editor for hire, I firmly believe in self-editing. Each month I’m going to drop a tip for developing your ability to edit your own work or identify things to look for as you edit. Make sure to check out all the DIY Edit Tips to improve your self-editing.


08 Crutch Phrases

Crutch phrases are the default phrases we use for descriptions, to move the story along, or to get ourselves back into the work. Because they are our personal defaults, they can appear over and over and over in our work without us consciously realizing that we’re being repetitive. The phrases themselves may not be examples of poor writing, but used in repetition they drag down the writing and clog the narrative.

Crutch phrases are one of the most difficult things to pick out of your own work. A friend or editor might notice your tendency to use the construction “Joe managed to [verb]” or that people are always looking over their shoulders to make observations, but since your crutch phrases are your go-to phrases, they are practically invisible to the author—until they’re pointed out. So how can you identify crutch phrases without getting a secondary reader?

A few of the strategies I use for identifying my own crutch phrases I’ve already addressed in DIY Edit. Anything related to creating distance is sure to help with crutch phrases because those strategies help you come back to the work with fresh eyes. You also might consider reading slowly and using a highlighter to mark the manuscript for phrases you think are familiar. One of the most effective strategies for identifying crutch phrases requires a little technology.

Free apps like Text Analyser and the Phrase Frequency Counter can analyze a story to find repeated phrases. In my personal search I discovered that an app like this was a good starting point. The app would identify that looking over shoulders was an overused gesture in my novel, and then, by searching for “shoulder” throughout the document, I could start finding all the permutations of the phrase, including hes, shes, and specific characters performing the action. It took a little organization, pattern analysis, and then creativity to assess whether or not to leave one of these crutch phrases or revise it, but overall this search helped to elevate my prose and the whole exercise made me more aware of my habits as a writer. Being aware of your crutch phrases is the best way to avoid them, or at least find them in the future.


Like what you read? Help me continue making this content by leaving a tip through Ko-fi.

This last week I dove back into the novel I worked on during National Novel Writing Month. While I had a successful NaNoWriMo in 2017, I also took a helter-skelter approach to putting words on the page. I jumped around in my outline when I ran out of steam. I allowed new, unplanned characters to appear and take my attention. I discovered solutions to plot problems and simply picked up the threads as if I had already written the scenes—or I wrote a divergent scene that covered those solutions, while still leaving the first scene in place (essentially writing an alternative universe, if you’re playing along from a sci-fi angle). All of that is great for writing 50,000 words, but not as good for writing a cohesive novel.

After a comfortable break—and wrapping another project—I’m ready to tackle this mess, and thought it was a good time to talk about how I start a revision.

Make a Schedule

The first task is to assess how much I have to read, and then make a schedule. While I’d like to finish the assessment pass in two weeks, I have a lot to read and some other obligations this month, so I’ve stretched my schedule to finish by the end of February.

I considered dividing the number of scenes or number of words by the number of days, but that can lead to some awkward splits and I’d rather make sure I’m comparing multiple options for the same scene on the same day. Any scenes not divided into chapters (which is most of them), I grouped by related content and then divided those into reasonable chunks. I also took my work and social calendar into account, so I wasn’t scheduling too much on a day when I was otherwise busy. At the end of this process I had a calendar and knew exactly what I should be working on each day.

Read the Draft

Once I’m ready to start reading, I gather my materials:

  • My manuscript (on the computer, currently)
  • A notebook
  • A pen
  • Highlighters

I set up my notebook with the working title of the manuscript, date, and the title of the first scene. Each new section of my notes starts with the title of the scene. Right now the scene titles are a letter for the first name of the POV character and a few words describing what happens. My first scene is “A: Boarding” because it’s when Alex boards the pirate ship.

This assessment pass is strictly to review ideas, figure out what’s missing from the plot, and choose which of those divergent paths I like best, so a lot of my notes are questions. Sometimes those questions are about when information is revealed (and I may find the answer in a later scene). Sometimes those questions are about research or world building that I need to develop. Generally most of my notes center around the plot and character relationships. I also jot down the existing character, setting, and world details, so I can start refining those aspects to later create consistency.

Within each section I take notes roughly in chronological order. I try to group character and setting details together, which may mean that I leave a few blank lines after a character introduction or when we enter a new setting, just in case I wrote some other pertinent details later in the scene.

At the end of each scene I write a one or two sentence summary. This summary should include the most important thing about the scene (from a plot and/or character standpoint) and will later act as a guide to help me figure out if the scene is important enough to make it to the next draft and if it’s in the correct place.

As a final step, I highlight headings so I can reference information later—characters are pink, world building and setting is blue, and plot is yellow. I use green to mark scenes I want to keep or elements in scrapped scenes I want to include in the next draft.

Assess the Draft

After I’ve finished the entire manuscript, I review my notes on what I’ve already written to figure out what adjustments need to be made to my outline, what scenes still need to be written, and what scenes belong in the trash file (I never delete my work while I’m drafting—I never know when I might want to return to an idea or description). By the time I’ve done that review of my notes, I should be ready to start writing again! We’ll find out at the end of February.

Even though I’m an editor for hire, I firmly believe in self-editing. Each month I’m going to drop a tip for developing your ability to edit your own work or identify things to look for as you edit. Make sure to check out all the DIY Edit Tips to improve your self-editing.


07 Tense Shift Triggers

Aside from reading over my work very carefully, one way I can find tense shifts is by being aware of times when I’m most likely to have a tense shift.


Past to Present

When writing in past tense, I’m careful to check for tense shifts after long sections of dialogue or thought and after flashbacks or memories.

Dialogue can cause a tense shift because the dialogue is usually written in present tense. Fast-paced dialogue with few tags or lines of narration can get me out of the habit of writing past tense, so when I finally slip back to narration, there’s a tense shift from past tense to present tense. Thought (which is also often written in present tense) can be a trigger for a similar reason.

Using the past perfect tense to describe something that happened in the “further” past from the story timeline (something that had happened) is another warning sign for a potential tense shift. As I transition to the story present, my mind sometimes wants to switch to present tense instead of returning to simple past, so flashbacks and memories are another good time to carefully check tenses.


Present to Past

My biggest problem with switching from present tense to past tense is that I’m so familiar writing and reading in past tense, I’m often surprised to find that I was writing a story in present tense at all (and I usually check to see if it’s the result of a tense shift). But when I have discovered shifts in my present tense fiction they tend to be based around flashback and memories and around breaks in my writing schedule.

Because I’m so used to writing and reading in past tense, it feels awkward to use past tense to talk about events that happened “yesterday” in a present tense story. Often, I find that I switched to past perfect to describe the earlier events and then I slipped into past tense for the narrative, instead of going back to present tense. Oops.

I’ve also noticed that I make more tense shifts after taking a break from working on a story. When I get out of the story’s world, I tend to forget what tense I’m writing and assume it must be past tense. I’ve tried to train myself to confirm the tense before I get 500 or 1,000 words into a scene in the wrong tense, but it’s a tough thing to remember when I’m also trying to remember character and world details.


While these are triggers I’ve identified in my own work, they may not be your tense shift triggers. As you edit and revise your work, pay attention to when you catch tense shifts and see if you can find a pattern. Do they happen mostly after dialogue? At the start of new scenes? When you’re writing from a particular point of view? Analyzing the patterns of our mistakes is the path to finding and correcting them in the future.


Like what you read? Help me continue making this content by leaving a tip through Ko-fi.

Even though I’m an editor for hire, I firmly believe in self-editing. Each month I’m going to drop a tip for developing your ability to edit your own work or identify things to look for as you edit. Make sure to check out all the DIY Edit Tips to improve your self-editing.


05 Creating Distance: Change of Medium

Another way to create distance to achieve that elusive objectivity when editing your own work is to change the medium.

Printing out the story and editing a hard copy is one of the most effective methods for me. Marking with a pencil or pen helps shift my brain out of writer mode and into editor mode, since I am literally using different tools to edit the work than the tools I used to write the work. It also helps me feel a little bit like I’m reading someone else’s work, since I’m used to reading the printed work of others.

If you don’t have the resources to print your work (and let’s face it, that kills a lot of trees), try changing the font type, point size, or margins. When the line breaks fall differently from the ones I’ve been staring at for weeks, I catch more typos and missing words. I also read the sentences more carefully, since I’m seeing them in a new form, which allows me to find errors and awkward phrasings.

Changing the medium is just a trick to help you view your work with new eyes, but it’s one that has helped slow me down and allowed me to more carefully review and edit my own work.

If objectivity is one of your main obstacles to being your own best editor, keep an eye out for other tips on “Creating Distance.”


Like what you read? Help me continue making this content by leaving a tip through Ko-fi.

Even though I’m an editor for hire, I firmly believe in self-editing. Each month I’m going to drop a tip for developing your ability to edit your own work or identify things to look for as you edit. Make sure to check out all the DIY Edit Tips to improve your self-editing.


03 Blank Slate: Setting

When an editor or a reader engages your manuscript, they are a blank slate regarding the details of your world. Even the best synopsis will still leave the reader without the full depth and scope of your character and setting. Putting yourself in the role of the blank slate is a great way to make sure the world you write is as vivid and detailed as the world you imagine.

Picture each setting using only what is described on the page. All other areas should be black in your mind. For example, when a character enters a room, pay attention to how much of the room is described. Do you have a sense of the space the character will be navigating? What about the obstacles the character will have to move around or interact with? Do you know what the room is used for? What does the room tell you about the owner (rich/poor, extravagant/practical, neat/messy)?

As you continue reading, think about what questions arise, and then make a list of what details you need to add. For example:

  • Your character winds around the whole room, but on initial introduction you never mentioned the furniture was crowded. Add that.
  • Your character shuts the drapes, casting the room into darkness. Add that the only light is from the window.
  • Your character notes several scenes later that a couch is just like the one in the last room they were in. Add the couch in the previous room.
  • Your character turns down the radio, but has been having a conversation throughout the scene. Add how loud the radio is at the start of the scene.

After you have built the mental picture of the space from what’s on the page, consider if there are any important details you see in your writer vision that are missing from the written version. Don’t forget to engage senses other than sight—what is the temperature of the room, what sounds are there, is there a smell drifting in? Building your written locations as though you’ve never seen them in your mind’s eye is a great way to figure out what other details you need to include.


Like what you read? Help me continue making this content by leaving a tip through Ko-fi.

Even though I’m an editor for hire, I firmly believe in self-editing. Each month I’m going to drop a tip for developing your ability to edit your own work or identify things to look for as you edit. Make sure to check out all the DIY Edit Tips to improve your self-editing.


One of the trickiest things when editing your own work is achieving objectivity. There are a number of ways you can go about creating objectivity in relation to your own work. Keep an eye out for tips on “Creating Distance” if objectivity is one of your main obstacles to being your own best editor.

02 Creating Distance: Time

Giving your story some time to rest before starting an editing pass is one of the best ways to distance yourself from your work. Time allows your writer memory to fade and helps make details hazy, giving yourself a fresh set of eyes. While you previously could recite all of chapter 12 from memory, after a month away, you may only be able to roughly recall the events and your favorite lines. For the purposes of self-editing, this is a good thing.

As you create distance from your work, it allows your editor brain to more easily identify when something is missing (from a plot hole to missing words in a sentence), and it makes it a little easier to catch unnecessary repetitions. From the plot and structure to the sentence construction, taking time away from your work allows your eyes to rest and you can start seeing your work from a new perspective.

For novels or novellas, my preference is to set aside the story for two months. For short stories two weeks is usually sufficient. Sometimes deadlines or other complications demand a shorter cooling-off period, so, if that is the case, I put the story down for as much time as I can allow. Waiting to edit helps me shift from being a writer to being an editor, and generally lets me gain a little perspective before acting as my own reviewer. Give it a try and see if it works for you.


Like what you read? Help me continue making this content by leaving a tip through Ko-fi.