With my goal to be an every day writer, I can’t really take a sick day. But I also can’t expect a normal writing day while I have a sore throat, runny nose, and major exhaustion. When I’m sick, here’s how I make the adjustments to take care of myself and still be productive:


Put aside non-writing activities.

To make sure I have the energy to write, I take a sick day from all non-writing activities. That means I step away from the blog, editing, responding to emails, and anything else that is part of my “work” stack. Doing this lets me focus my time on self-care and on writing, which will not only help keep my writing streak, but hopefully let me get better faster.


Rest up, then write.

The moment I’m out of bed and feeling up to sitting at the computer, I go for it! That might be my only writing session for the day, but if I’m prepared for it, 10 minutes will be all that I need.


Lower the bar.

Normally my daily writing includes working on my current projects, but on a sick day I’ll let myself chase a stray thought or write something I might not complete.

My daily goal includes writing 400 words per day, but this is where my minimum goal of 150 words per day kicks in. When I’m not feeling well, I’m perfectly fine to stop writing after hitting 150 words. That’s the whole reason I have a minimum goal, so that when I’m really, really not feeling up to it, I have a low bar to clear while still making the effort to write every day.


Pick at it.

Sometimes I can’t do the 10-minute stretch, or the 10 minutes weren’t very productive, so instead of working in my usual method, I pick at writing. That may mean writing a few sentences on several different things, or writing one or two sentences at a time on something in progress. I keep the pace slow for my medicine-logged brain and go where my attention seems to prosper.


It’s tough to stay productive when I’m not feeling well, but usually my stubbornness is enough to get me to the page and keep me writing. Even though I might crawl back into bed and collapse into a pillow for a long nap, getting something written makes me feel better—at least emotionally.

What do you do to help yourself keep motivated when you’re not feeling well? Do you plan sick days into your schedule, do you let yourself off the hook, or do you push yourself to keep working?

Even though I’m an editor for hire, I firmly believe in self-editing. Each month I’m going to drop a tip for developing your ability to edit your own work or identify things to look for as you edit. Make sure to check out all the DIY Edit Tips to improve your self-editing.


08 Crutch Phrases

Crutch phrases are the default phrases we use for descriptions, to move the story along, or to get ourselves back into the work. Because they are our personal defaults, they can appear over and over and over in our work without us consciously realizing that we’re being repetitive. The phrases themselves may not be examples of poor writing, but used in repetition they drag down the writing and clog the narrative.

Crutch phrases are one of the most difficult things to pick out of your own work. A friend or editor might notice your tendency to use the construction “Joe managed to [verb]” or that people are always looking over their shoulders to make observations, but since your crutch phrases are your go-to phrases, they are practically invisible to the author—until they’re pointed out. So how can you identify crutch phrases without getting a secondary reader?

A few of the strategies I use for identifying my own crutch phrases I’ve already addressed in DIY Edit. Anything related to creating distance is sure to help with crutch phrases because those strategies help you come back to the work with fresh eyes. You also might consider reading slowly and using a highlighter to mark the manuscript for phrases you think are familiar. One of the most effective strategies for identifying crutch phrases requires a little technology.

Free apps like Text Analyser and the Phrase Frequency Counter can analyze a story to find repeated phrases. In my personal search I discovered that an app like this was a good starting point. The app would identify that looking over shoulders was an overused gesture in my novel, and then, by searching for “shoulder” throughout the document, I could start finding all the permutations of the phrase, including hes, shes, and specific characters performing the action. It took a little organization, pattern analysis, and then creativity to assess whether or not to leave one of these crutch phrases or revise it, but overall this search helped to elevate my prose and the whole exercise made me more aware of my habits as a writer. Being aware of your crutch phrases is the best way to avoid them, or at least find them in the future.


Like what you read? Help me continue making this content by leaving a tip through Ko-fi.

Making goals at the start of the year is exciting. “I’m going to do all the things! I’m going to live a better life! I’m going to succeed!” But a month or two into the year it’s easy to figure out all those big plans may not actually pan out. So, what do you do? Give up? Punish yourself? Make adjustments?

I’m an advocate for continuing in the face of failure and realigning my expectations. Realignment can come in a number of ways:

  • Trimming out goals that I know I cannot achieve
  • Breaking a goal into landmarks so I can check off achievements
  • Reducing goals to something that is more achievable
  • Replacing goals with goals that better align with how the year is going


Trim

Last year I planned to write two novels—one during the year and a draft of a new one during NaNoWriMo 2017. The novel I was planning to write over the year became what I worked on during NaNo. My time just didn’t align for being able to work on the draft earlier than November. Trimming out a new novel was an easy decision for me to make, even though it was disappointing when I looked back on my plans for 2017. But it was the right decision, because looking back on the year, I have no idea how I would have been able to work on another novel during 2017.


Break

For the novel I worked on last year, I kept feeling intimidated by the process. Rather than continuing to look at it as “draft a novel” (which only sounds simple on paper), I broke it into several steps: write a two-page synopsis, draft character arcs for the main characters, re-read what’s been written, write 1,667 words per day during NaNoWriMo. Breaking the task into those smaller chunks gave me a plan for approaching the whole goal, and, even though I didn’t actually finish the draft, I did all of those other things! So even though I didn’t hit the main goal, I feel good about the progress I made.


Reduce

Last year I planned to write 200K words. That pans out to 548 words per day. I hit the 200K early, but decided since writing was going so well, I should keep writing 548 words per day. Oh. Oh no. That did not work. Instead of beating myself up, I reduced the goal. I changed it first to 500 words per day and then to 400 and finally to writing on a specific project (and at least 100 words). Each adjustment fit with what was going on in my life and it kept me productive on the main goal (writing) without feeling bad about not hitting an unrealistic landmark.


Replace

I had every intention of launching my editorial website in 2017. By the time October hit, I realized I was not in a place mentally where I could offer my services to strangers. My friend had died, my cousin was in liver failure, and several other areas of my life were already in upheaval—did I really need to stick to a goal that could easily be pushed to a later date? Instead of pushing myself when I really needed to take care of myself, I dropped my launch goal and replaced it with a goal to take care of my mental health. I started grief counseling and focused my efforts on being mindful of my feelings, my grief, and finding joy. It was quite a switch from focusing on business, but it was the right switch for what was going on in my life.


Your goals should never be static, and they should never hinder you. If your goals are stressing you out and demotivating you, you should revisit them and revise them. Goals are supposed to make us better, to get us closer to the people we want to be, but we have to work with the people we are now and what we can bring to the table today. Realign your expectations, throw out what doesn’t work, but don’t give up.

This last week I dove back into the novel I worked on during National Novel Writing Month. While I had a successful NaNoWriMo in 2017, I also took a helter-skelter approach to putting words on the page. I jumped around in my outline when I ran out of steam. I allowed new, unplanned characters to appear and take my attention. I discovered solutions to plot problems and simply picked up the threads as if I had already written the scenes—or I wrote a divergent scene that covered those solutions, while still leaving the first scene in place (essentially writing an alternative universe, if you’re playing along from a sci-fi angle). All of that is great for writing 50,000 words, but not as good for writing a cohesive novel.

After a comfortable break—and wrapping another project—I’m ready to tackle this mess, and thought it was a good time to talk about how I start a revision.

Make a Schedule

The first task is to assess how much I have to read, and then make a schedule. While I’d like to finish the assessment pass in two weeks, I have a lot to read and some other obligations this month, so I’ve stretched my schedule to finish by the end of February.

I considered dividing the number of scenes or number of words by the number of days, but that can lead to some awkward splits and I’d rather make sure I’m comparing multiple options for the same scene on the same day. Any scenes not divided into chapters (which is most of them), I grouped by related content and then divided those into reasonable chunks. I also took my work and social calendar into account, so I wasn’t scheduling too much on a day when I was otherwise busy. At the end of this process I had a calendar and knew exactly what I should be working on each day.

Read the Draft

Once I’m ready to start reading, I gather my materials:

  • My manuscript (on the computer, currently)
  • A notebook
  • A pen
  • Highlighters

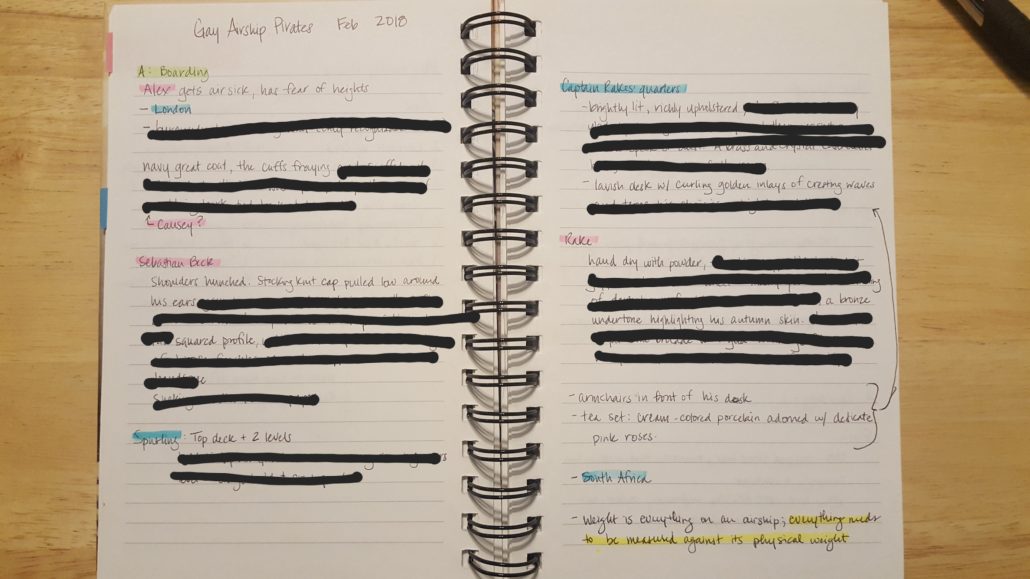
I set up my notebook with the working title of the manuscript, date, and the title of the first scene. Each new section of my notes starts with the title of the scene. Right now the scene titles are a letter for the first name of the POV character and a few words describing what happens. My first scene is “A: Boarding” because it’s when Alex boards the pirate ship.

This assessment pass is strictly to review ideas, figure out what’s missing from the plot, and choose which of those divergent paths I like best, so a lot of my notes are questions. Sometimes those questions are about when information is revealed (and I may find the answer in a later scene). Sometimes those questions are about research or world building that I need to develop. Generally most of my notes center around the plot and character relationships. I also jot down the existing character, setting, and world details, so I can start refining those aspects to later create consistency.

Within each section I take notes roughly in chronological order. I try to group character and setting details together, which may mean that I leave a few blank lines after a character introduction or when we enter a new setting, just in case I wrote some other pertinent details later in the scene.

At the end of each scene I write a one or two sentence summary. This summary should include the most important thing about the scene (from a plot and/or character standpoint) and will later act as a guide to help me figure out if the scene is important enough to make it to the next draft and if it’s in the correct place.

As a final step, I highlight headings so I can reference information later—characters are pink, world building and setting is blue, and plot is yellow. I use green to mark scenes I want to keep or elements in scrapped scenes I want to include in the next draft.

Assess the Draft

After I’ve finished the entire manuscript, I review my notes on what I’ve already written to figure out what adjustments need to be made to my outline, what scenes still need to be written, and what scenes belong in the trash file (I never delete my work while I’m drafting—I never know when I might want to return to an idea or description). By the time I’ve done that review of my notes, I should be ready to start writing again! We’ll find out at the end of February.

Even though I’m an editor for hire, I firmly believe in self-editing. Each month I’m going to drop a tip for developing your ability to edit your own work or identify things to look for as you edit. Make sure to check out all the DIY Edit Tips to improve your self-editing.


07 Tense Shift Triggers

Aside from reading over my work very carefully, one way I can find tense shifts is by being aware of times when I’m most likely to have a tense shift.


Past to Present

When writing in past tense, I’m careful to check for tense shifts after long sections of dialogue or thought and after flashbacks or memories.

Dialogue can cause a tense shift because the dialogue is usually written in present tense. Fast-paced dialogue with few tags or lines of narration can get me out of the habit of writing past tense, so when I finally slip back to narration, there’s a tense shift from past tense to present tense. Thought (which is also often written in present tense) can be a trigger for a similar reason.

Using the past perfect tense to describe something that happened in the “further” past from the story timeline (something that had happened) is another warning sign for a potential tense shift. As I transition to the story present, my mind sometimes wants to switch to present tense instead of returning to simple past, so flashbacks and memories are another good time to carefully check tenses.


Present to Past

My biggest problem with switching from present tense to past tense is that I’m so familiar writing and reading in past tense, I’m often surprised to find that I was writing a story in present tense at all (and I usually check to see if it’s the result of a tense shift). But when I have discovered shifts in my present tense fiction they tend to be based around flashback and memories and around breaks in my writing schedule.

Because I’m so used to writing and reading in past tense, it feels awkward to use past tense to talk about events that happened “yesterday” in a present tense story. Often, I find that I switched to past perfect to describe the earlier events and then I slipped into past tense for the narrative, instead of going back to present tense. Oops.

I’ve also noticed that I make more tense shifts after taking a break from working on a story. When I get out of the story’s world, I tend to forget what tense I’m writing and assume it must be past tense. I’ve tried to train myself to confirm the tense before I get 500 or 1,000 words into a scene in the wrong tense, but it’s a tough thing to remember when I’m also trying to remember character and world details.


While these are triggers I’ve identified in my own work, they may not be your tense shift triggers. As you edit and revise your work, pay attention to when you catch tense shifts and see if you can find a pattern. Do they happen mostly after dialogue? At the start of new scenes? When you’re writing from a particular point of view? Analyzing the patterns of our mistakes is the path to finding and correcting them in the future.


Like what you read? Help me continue making this content by leaving a tip through Ko-fi.

Even though I’m an editor for hire, I firmly believe in self-editing. Each month I’m going to drop a tip for developing your ability to edit your own work or identify things to look for as you edit. Make sure to check out all the DIY Edit Tips to improve your self-editing.


06 Description: Camera Pan

Details make a story, but so often I read over a description and my attention is darting all around a room, or all over a character, and I can’t make sense of how the whole thing fits together. It’s the writer’s job to guide the camera and to show the reader the details in an order that will allow them to imagine what’s being described and assemble the whole picture.

When a character first walks into a new setting that you plan to describe in detail, organize the description to follow a camera pan of the room. This can be a vertical pan (up and down) or a lateral pan (left and right). This helps the reader orient the character within the space and gives a clear idea of how the eye is drawn (i.e., what is most important or impressive about the setting).

For example, when a character enters a foyer in a mansion, the description might start with the flooring, go up to the stairs, wrap around to the chandelier, describe the chandelier with more detail, and then come back to the first floor foyer. A logical flow up, up, and back to the character.

If the character is very tired and coming back to their bedroom, the description of the room might start with their bed and then include what they passed on their way from the door to a faceplant, or what they can see through the slits of their eyes across from the bed. Regardless, it’s important to ground the reader so that later when ninjas break through the window, the reader knows if the window is next to the bed or across from it.

Even a character who is out of their mind with anxiety, drugged, or otherwise impaired will look around a room in a way that emphasizes the important information. They may not be able to perfectly orient themselves, but they’ll be able to hit on the most important details and then flesh out those details once they’re feeling calmer.

This works the same for describing a person’s appearance. Either describe from the feet up (if the first thing the character would observe is the person’s shoes or feet), or describe from the head down (if the first thing the character observes is the person’s hair or face). Some details can emerge later—a mole the character didn’t notice earlier, nervous tics, or maybe as the couple falls in love his features become more attractive—but that first description should follow a logical flow.

Keeping the description organized helps the reader visualize and remember it.  Organizing the details emphasizes your careful work, and lets the reader focus on those details rather than struggle to follow a darting eye.


Like what you read? Help me continue making this content by leaving a tip through Ko-fi.

Even though I’m an editor for hire, I firmly believe in self-editing. Each month I’m going to drop a tip for developing your ability to edit your own work or identify things to look for as you edit. Make sure to check out all the DIY Edit Tips to improve your self-editing.


05 Creating Distance: Change of Medium

Another way to create distance to achieve that elusive objectivity when editing your own work is to change the medium.

Printing out the story and editing a hard copy is one of the most effective methods for me. Marking with a pencil or pen helps shift my brain out of writer mode and into editor mode, since I am literally using different tools to edit the work than the tools I used to write the work. It also helps me feel a little bit like I’m reading someone else’s work, since I’m used to reading the printed work of others.

If you don’t have the resources to print your work (and let’s face it, that kills a lot of trees), try changing the font type, point size, or margins. When the line breaks fall differently from the ones I’ve been staring at for weeks, I catch more typos and missing words. I also read the sentences more carefully, since I’m seeing them in a new form, which allows me to find errors and awkward phrasings.

Changing the medium is just a trick to help you view your work with new eyes, but it’s one that has helped slow me down and allowed me to more carefully review and edit my own work.

If objectivity is one of your main obstacles to being your own best editor, keep an eye out for other tips on “Creating Distance.”


Like what you read? Help me continue making this content by leaving a tip through Ko-fi.

Sometimes one of the hardest things to do is to keep writing through your first draft. Ideas can feel flat and uninspired. Characters might not meet the expectations you set out for them. Obstacles wind up being easier to overcome than you imagined, or, the opposite, you find yourself written into a corner. It is frustrating and infuriating and quitting starts looking better and better because, let’s face it, your first draft sucks.

But the good news is that all first drafts suck. No matter how much planning you do in advance, there’s a big difference between an idea and a story. A story requires details and specifics and everything has to work together. Sentences have to be crafted, motivations have to be honed, choices have to be made, and consequences have to be realized. Moving from an idea to a final product takes a lot of work, and the first draft is the first step. And the first draft is always a messy step.

First drafts don’t just suck because they are the messy beginnings of a novel. They suck because they’re difficult to write and they’re difficult to stick with. But the reason you must keep writing through a terrible first draft is simple: blank pages can’t be revised. In order to make the book better, something needs to be on the page. Revising is like sculpting, and the first draft is how you make the clay.

Sculptures can’t be made without material to sculpt, and the same works for stories. The first draft has to be written so the writer has something to revise and craft into the finished work. It may be tempting to stop in the middle and start revising, but not finishing your first draft is a disservice to your story and sometimes a waste of your time. Even the most organized planners can discover things about their characters, plot, and world through writing the first draft. Ideas develop organically—it becomes clear that the character should turn left instead of right, a sub-plot more fully develops, one idea spawns another and a new area of the world is fleshed out. You might discover that a scene you wrote well and loved doesn’t belong in your novel any more—and if you spent your time honing it instead of writing to the end of your first draft, you would have wasted that time.

So push through your first draft. Even when it sucks, try your best to love the experience and motivate yourself to continue. Reward yourself for writing. Tell your friends what you’ve completed. Write the scenes that excite you. Write out of order. Leave gaping holes that just have notes like “battle scene” or “much smooching” or “Kate and Joe need to talk.” Leave notes to yourself about ideas you get as you’re drafting or revisions you want to make, but keep writing forward. You’ll have a mess by the end. You’ll have a draft that sucks, but you’ll have a draft that you can craft, make better, and sculpt into the story you were always meant to write. As much as writing is about revising, revising can’t happen if you don’t have a first draft.

Even though I’m an editor for hire, I firmly believe in self-editing. Each month I’m going to drop a tip for developing your ability to edit your own work or identify things to look for as you edit. Make sure to check out all the DIY Edit Tips to improve your self-editing.


04 Narration: Self-Referential Language

One of my writing professors always marked our stories for what she called “self-referential language.” This syntax plagues first person and close third person point of view by calling attention to the fact that the reader is an observer of a character.

Phrases like “I watched…” or “She looked…” or “He heard…” shift the focus from the POV character’s observations (the purpose of first and close third narration) to the observation of the character.

Consider the difference in these sentences:

From the window I watched the valets pack the carriage.

Outside the window, the valets packed the carriage.

In the first sentence, the reader is focused on the character watching the valets through the window. If this image were in a movie, the screen would include the window frame and the character in front of the window, looking out on the valets.

In the second sentence, it’s still clear that the POV character is inside the house, but this version of the sentence focuses the reader on watching the valets through the eyes of the POV character. As a movie, what the character is watching fills the screen, and the reader is fully immersed in the point of view of the first person narrator.

Editing out self-referential language can make the point of view more immersive and bring the reader closer to the characters and action. It can also help eliminate weak and overused verbs. Here are some combinations to look out for when trying to strengthen your point of view narration:

I/he/she watched
I/he/she saw
I/he/she looked
I/he/she heard
I/he/she listened
I/he/she touched
I/he/she smelled
I/he/she tasted

Watch out for other verbs and sentence constructions that put the emphasis on the character observing rather than on what the character is observing.


Like what you read? Help me continue making this content by leaving a tip through Ko-fi.

Even though I’m an editor for hire, I firmly believe in self-editing. Each month I’m going to drop a tip for developing your ability to edit your own work or identify things to look for as you edit. Make sure to check out all the DIY Edit Tips to improve your self-editing.


03 Blank Slate: Setting

When an editor or a reader engages your manuscript, they are a blank slate regarding the details of your world. Even the best synopsis will still leave the reader without the full depth and scope of your character and setting. Putting yourself in the role of the blank slate is a great way to make sure the world you write is as vivid and detailed as the world you imagine.

Picture each setting using only what is described on the page. All other areas should be black in your mind. For example, when a character enters a room, pay attention to how much of the room is described. Do you have a sense of the space the character will be navigating? What about the obstacles the character will have to move around or interact with? Do you know what the room is used for? What does the room tell you about the owner (rich/poor, extravagant/practical, neat/messy)?

As you continue reading, think about what questions arise, and then make a list of what details you need to add. For example:

  • Your character winds around the whole room, but on initial introduction you never mentioned the furniture was crowded. Add that.
  • Your character shuts the drapes, casting the room into darkness. Add that the only light is from the window.
  • Your character notes several scenes later that a couch is just like the one in the last room they were in. Add the couch in the previous room.
  • Your character turns down the radio, but has been having a conversation throughout the scene. Add how loud the radio is at the start of the scene.

After you have built the mental picture of the space from what’s on the page, consider if there are any important details you see in your writer vision that are missing from the written version. Don’t forget to engage senses other than sight—what is the temperature of the room, what sounds are there, is there a smell drifting in? Building your written locations as though you’ve never seen them in your mind’s eye is a great way to figure out what other details you need to include.


Like what you read? Help me continue making this content by leaving a tip through Ko-fi.